|
A program is nothing more than a sequence of keystrokes in the calculator and executed automatically with the press of a button – one keystroke replacing many.
You can then execute the program as often as you like – typically with just one keystroke. The answer displayed at the end of execution is the same one you would have obtained
by pressing the keys one at a time manually. No prior programming experience is necessary for RPN-55 calculator programming.
To get you started, try entering and executing the sample program shown on the Info screen of RPN-55 SD (double-tap the info
button in the lower-right corner).
Compatibility
- Loading a program in Vintage mode that was saved in Extended mode will trigger a warning about advanced features not available in Vintage mode.
The warning may be ignored if the program does not use extended features or functions. To suppress the warning, resave the program in Vintage mode.
- Make sure that any program you enter does not rely on having exactly 49 steps available.
- Settings like angle mode or display mode are saved and restored with programs, even in vintage mode.
In vintage mode, turn the calculator off, then on to clear all memory and restore default settings.
Entering and running a program
- Tap PRGM just above the mode switch to enter program mode
- To clear the program memory, tap g CLP
(in vintage mode, turn the calculator off, then on)
- Enter your program steps
- Tap PRGM to return to RUN mode.
- Tap BST to address the top of program memory.
- Tap R/S to run the program
Reviewing your program
- Tap PRGM to re-enter program mode.
- Tap SST to single-step through your program lines.
Likewise, use BST (back-step) to see previous steps.
- In extended mode, pressing BST at step 00 will take you to the last program step.
- To see the entire program, tap the display in program mode.
Debugging your program
- Tap SST in RUN mode to execute your program step-by-step.
- While the SST key is depressed, the display shows the next instruction about to be executed.
- After the step is executed, the next step number appears at the left.
(Tap the lower-left display corner to show or hide it.)
Editing your program
Vintage Mode:
Editing programs is straight-forward in Vintage mode: by pressing keys, you simply overwrite whatever
is stored at the current step.
You delete a step, say step 27, by overwriting it with a GTO 28 instruction.
To insert a step, replace the current step with a GTO instruction to a free memory location, reenter the replaced step there,
then add the new step or steps, and finally enter a GTO command pointing back to the step just after the new GTO instruction.
To delete a prefix key (f or g):
Proceed as describted in the previous paragraph.
Extended Mode:
The extended mode of RPN-55 SD provides automatic insertion of a new step, as well as a delete command to remove a step.
In both cases, affected GTO commands are automatically adjusted to the changed target steps.
If the GTO's target lies in the unused program area after your last program step, no adjusting is needed.
- To insert a step after the current step, simply enter the desired key or keys.
- To delete a step, tap g DEL
You may also delete steps directly in the program listing (see picture at right).
- To delete a range of steps:
1. Switch to RUN mode.
2. Enter the first and the last step to delete in x and y (any order).
3. Press g CLP.
- To go to any step, enter GTO nn in RUN mode.
- To find the last step of your program, execute RUN – BST – PRGM – BST.
- To cancel a GTO command input, simply enter the desired command.
- To correct a wrong first digit while entering a GTO command, tap GTO again to restart the step number input.
- To delete a prefix key (f or g), press f or g again.
- To change a prefix key (f or g), press the desired key.
Example:
If you insert GTO 19 after step 03 to branch to the instruction currently defined at step 19,
what gets stored is GTO 20, since your GTO instruction
is causing the rest of program memory to move down one line.
The display temporarily shows the corrected command followed by an asterisk (see below). Press BST, then SST to see how step 03 has been modified accordingly.
Entering GTO 19 after step 02:

Auto-corrected step 03:

Example program – Sum of 1 to x by Looping
- The program finds the sum of all integers from 1 to the number in X (display).
This is done by adding x times the value 1 to a register.
(9-year old Carl Friedrich Gauss, in 1753, would simply have calculated x/2 * (x+1),
but this program is intended to demonstrate looping.)
- Enter the 24-steps program shown below.
- After tapping RUN to return to run mode, tap BST to address step 00.
Test case: Find the sum of all integers from 1 to 100.
Solution: Enter 100, tap R/S. Result: 5050

HP-55 Programming Trick
The problem:
- Your program should perform some calculations on a number the user enters.
- You want to make sure that all registers are cleared (CL R and/or CL.R)
- But clearing all registers would also wipe out the user's parameter in X.
The solution:
- Start your program like this:
ENTER – CL R f LASTx
- This saves the user's input in LastX which does not get cleared.
On RPN-55 SD, you can preserve all values on the stack:
f PUSH CL R g POP
Make sure to use f CL R, as g CL.R clears the stack of stacks.
HP-55 Programming Pad
 and print to make your programming life easier... and print to make your programming life easier...
(Contributed by Roland K.)
|
| |
|
|
Managing programs on RPN-55 |
| |
|
|
|
| |
|
|
Switch to PRGM mode.
Tap the display to open the program listing.
You can use a proportional or a non-proportional font in the description.
Long-press any line of the listing to change.
Note that the current step is highlighted:
|
| |
|
|
 |
| |
|
|
|
| |
|
|
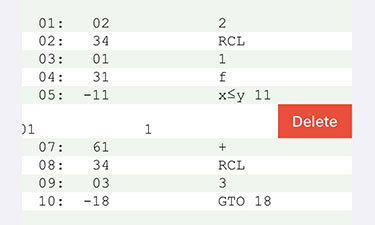
Steps may be deleted by swiping left across the line: |
| |
|
|
 |
| |
|
|
|
| |
|
|
Tap Save to copy the changed program to the calculator.
To exit without changing the program, tap Cancel.
If you select a line before exiting, the line will be shown on the calculator display.
|
| |
|
|

 |
| |
|
|
|
| |
|
|
Exporting a program |
| |
|
|
A program may be saved for later use or for archiving purposes.
- Tap Programs
- Tap Export
This will save the program, display format, angular mode, and the RAND setting.
or
- Tap Export w/Regs
This will save the program, display format, angular mode, RAND setting, and all storage registers.
- The program will be saved in RPN-55's Documents folder on your iPhone under the name you've given it as title.
- If desired, use iTunes File Sharing to copy the program to your computer for archiving.
|
| |
|
|
 |
| |
|
|
- Programs may have any name as long as the extension .rpn55 is preserved.
|
| |
|
|
|
| |
|
|
Importing a program |
| |
|
|
To import a program from the Documents folder:
- Tap Programs
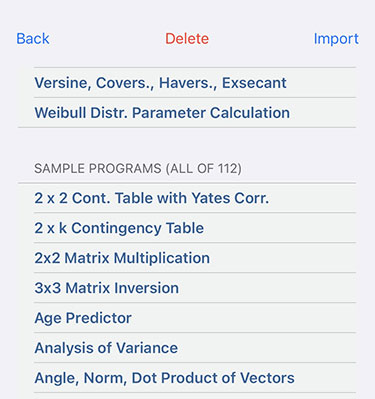
- You'll be presented with a list of all your programs,
followed by the sample programs.

- Pick a program and tap Import.
or
Double-tap a program.
- If the program was stored with registers, you have several options:
• Import program and settings only
• Import program and primary registers R0..R9
• Import program and secondary registers R.0..R.9
• Import program and all registers

- The imported program is going to replace your current program, including title, description, modification date,
display format, angular mode, and RAND setting.
- If you want to load the imported program into the calculator, be sure to tap Save.
Tap Cancel to ignore the import and return to the calculator.
Note:
An empty program saved with registers will only replace the registers, leaving the program memory untouched.
This feature may be used to create pure data files.
|
| |
|
|
|
| |
|
|
Deleting the current program
|
| |
|
|
A. To delete the currently stored program and all metadata:
- In the program listing view, tap New.
- Tap Save to send the empty program to the calculator.
or
Tap Cancel to return without any changes.
B. To delete the currently stored program, but keep title and description:
- In the calculator view, tap g CLP (in PRGM mode).
If program memory is not empty, a warning message appears.
|
| |
|
|
|
| |
|
|
Deleting an exported program |
| |
|
|
- In the program listing view, tap Programs
- In the list of stored programs, swipe left across the program name.
or
Tap the red Delete button.
A warning message appears in both cases.
|
| |
|
|
|
| |
|
|
Printing and PDF creation |
| |
|
|
- In the program listing view, tap Print to send the listing to any attached printer.
- Tap P to send the program description to any attached printer.
(The P appears only if the description is not empty.)
- To create a PDF document of the listing or the description:
– Tap Print or P to see the preview
– Long-press the preview. You will see an enlarged view.
– Tap the enlarged view, then tap the Share button in the top-right corner.
|
|