|
Using the Paper Tape Printer
RPN-67's paper tape printer emulates the HP-97's printer and adds a few twists.
The tape can hold up to 2000 lines; older lines are dropped.
When using the printer, whether you are in MAN or NORM modes (where you must press Printx) or in TRACE (where RPN-67 automatically prints answers as they are calculated), printed numbers can be shown in any display format – fixed point, scientific notation, or engineering notation. By selecting the display format, you also select the print format.
Numbers that you key in – that is, numbers that are not the results of operations – are also printed by the HP-97. When you key in a number with the Print Mode switch set to NORM or TRACE, RPN-67 does not print it until you change display format or press a function key. Then the number is printed exactly as you keyed it in. A number that you keyed in is not the result of an operation, and no asterisks are printed to its right.
When you have keyed in a number, there is one time that the RPN-67 will change its format before printing. If you have specified fixed point notation and the number keyed in is also in fixed point format (i.e., you have not pressed EEX), RPN-67 will attempt to align the decimal points for easy readability on your printed copy. It will do this in fixed point notation by printing the number that you keyed in in the specified format (if the number can be printed without truncating), adding trailing zeros if necessary.
This feature permits you to key in numbers in fixed point notation and line up the decimal points in the printed record of your calculations.
Press and hold line
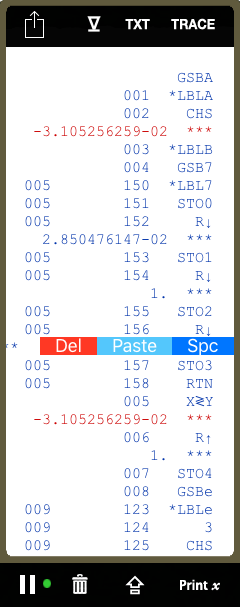
If you long-press a line, a ghost picture of the line appears. Release it to copy the line content to the pasteboard. You may also drag the picture to the display and paste it there.
Printing Modes
RPN-67 supports the HP-97's MAN, TRACE, and NORM printing modes:
- MAN
With the Print Mode switch set to MAN (manual), the printer is idle and does not print unless you press the Printx key or one of the other PRINT functions.
- TRACE
With the Print Mode switch set to TRACE, the calculator prints numbers, functions, and intermediate and final answers, just as they are seen in the display. The results of functions are printed with the symbol *** to the right of the number .
- NORM
With the Print Mode switch set to NORM (normal), the calculator records a history of the calculation sequence so that you can reconstruct your problem. In this mode you see digit entries and functions, but intermediate and final answers are not printed unless you press the Printx key.
When running a program in NORM and TRACE mode, RPN-67 also prints information about subroutine levels. The number at the left of a line indicates the step
where program flow will continue when the next RTN statement is encountered. No number means program execution will stop with the next RTN statement. Nested subroutines are displayed by indenting the step number
according to the nesting level. To advance the printer paper, tap the paper advance button at the bottom. Hold the button down to advance several lines.
To quickly scroll to the beginning or the end of the printout, tap the arrow button at the top.
Program Listing
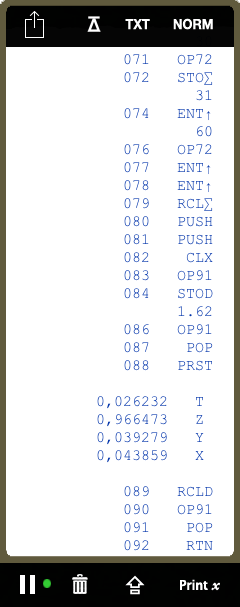
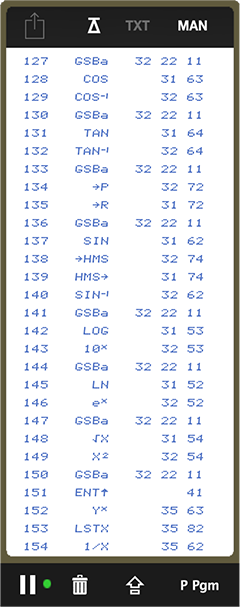
With the calculator mode switch set to W/PRGM, the paper tape printer's Printx button changes to P Pgm. Tapping the button prints the currently stored program as follows:
Print Mode switch set to MAN:
The printer lists step number, operation, and keycode for each step of program memory. The print range starts at the first non-R/S instruction from the current step
and ends at the last non-R/S step in program memory (as defined in "Number of Program Steps" in the settings.) All R/S inside this range will be printed.
Print Mode switch set to NORM or TRACE:
The printer lists only the step number and instruction, omitting the keycode. This type of listing is useful for preserving a record of your program without the keycodes.
The start of the print range is defined as in MAN mode, but printing will stop on the second R/S in succession.
In Vintage mode, printing stops after each R/S command. The step counter is automatically increased, allowing you to step through program memory by repeatedly tapping the
P Pgm key.
If "Number of Program Steps" is set to 224 and both card sides (steps 1...112 and steps 113...224, respectively) contain statements different from R/S, two consecutive R/S will be ignored on side 1
up to the first non-R/S on side 2. This feature allows auto-merged programs (see section above) to be printed in a single step.
Printing Display Value, Stack, and Registers
With the printer turned on and visible, commands like REG, STK and -x- will execute much faster than on the regular HP-67.
With the printer off or hidden, they run as usual.
Changing the Ribbon Color
Use the SYS/INFO command to change the default ribbon color of the paper tape printer.
Available colors are:
0 = black, 1 = gray,
2 = blue, 3 = light blue, 4 = green, 5 = light green,
6 = red, 7 = light red, 8 = purple, 9 = light purple
Example:
To change the ribbon color to blue, execute 2 OP SYS/INFO
Alternatively, you may use the PRT MODE command to change several printer settings, including color, at the same time.
Editing the Paper Tape
Swipe left on a paper tape line to delete it (DEL). You can also insert an empty line above a line (SPC), or paste text
created by the TXT button (PASTE – use Store Text for pasting in the dialog).
Using the Dot-matrix Font
In Vintage mode only, the paper tape may show a font mimicking the dot-matrix font used on the HP-97 calculator.
To enable/disable the font, the extended mode operation PRT MODE is used (see tab "Extensions".) In the parameter m.csdf expected by PRT MODE,
set f = 0 to disable the font, f = 1 to enable it.
For example, setting the parameter to -1.2001 would select MAN printing mode, negative results in red, blue ribbon color, dot-matrix font ON.
Since the dot-matrix font is not supported by the system, e-mailing and printing the paper tape is disabled while it is active.
Annotating the paper tape using the TXT command is disabled as well.
Creating and sharing a PDF version of the Paper Tape
1. Tap the Share button and select either "Print in Color" or "Print in Black"
2. Enlarge the image with two fingers
3. Tap the Share button
|



|


